프로젝트 생성
Notice : 안드로이드 스튜디오(AndroidStudio)를 먼저 다운로드 해주세요.
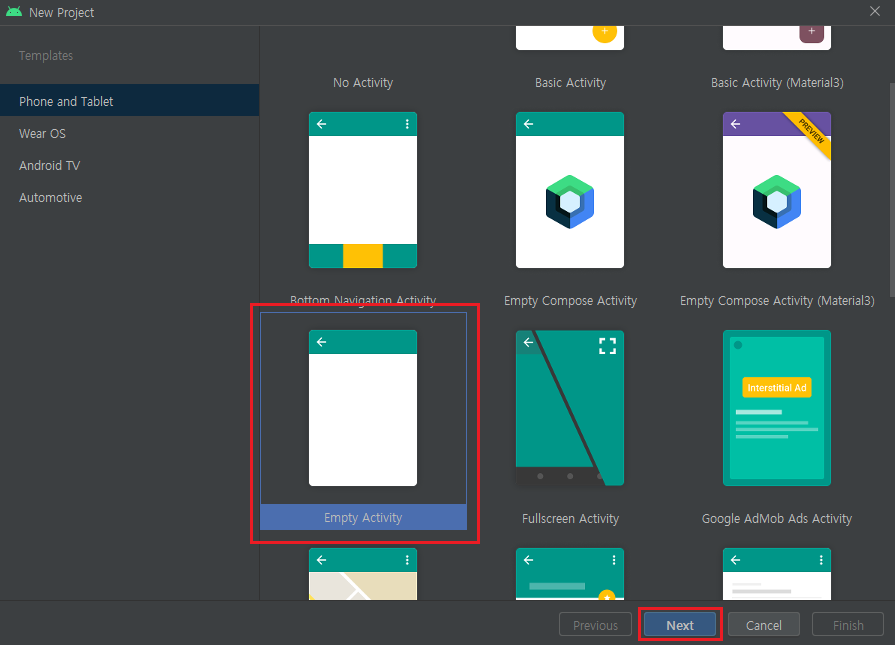
1. 프로젝트 생성
안드로이드 스튜디오를 실행 후 왼쪽 상단에 File > New > New Project를 클릭 후 Empty Activity를 선택 하고 Next 버튼을 클릭합니다.
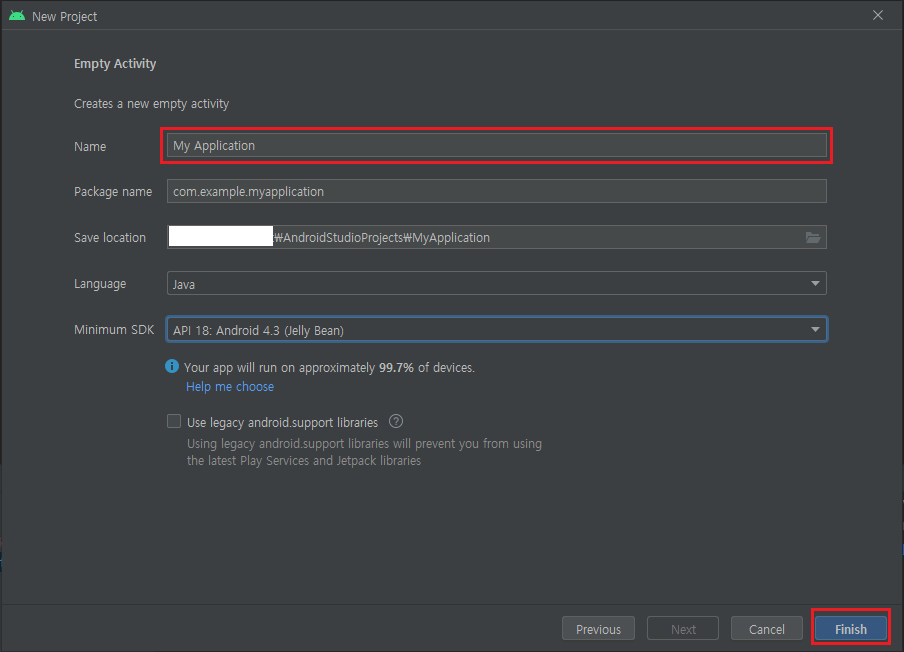
2. 프로젝트 생성 완료
프로젝트 이름을 작성하고 프로젝트가 저장될 경로를 확인 후 Finish 버튼을 클릭해주세요.
스크립트 작성
1. MainActivity.java
경로 : app > java > 패키지이름 > MainActivity
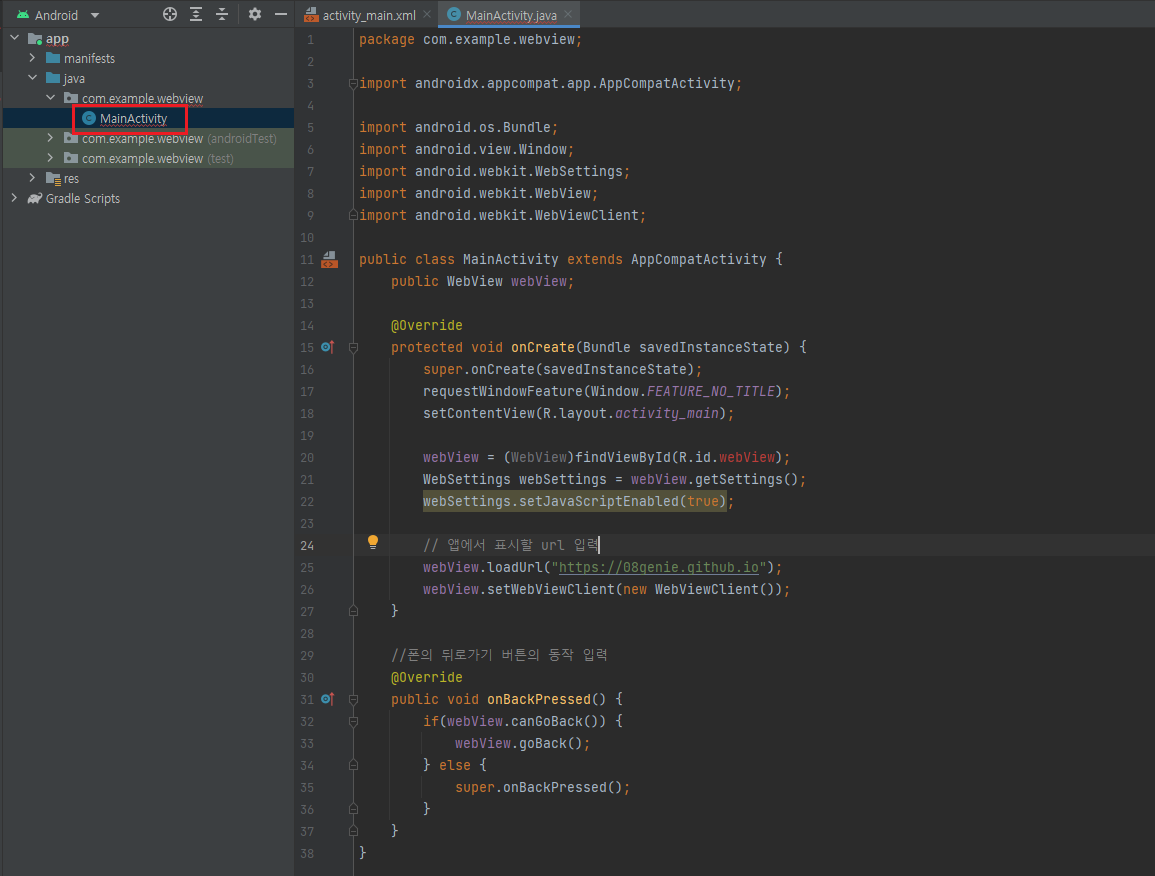
 package com.example.webview;

 이곳부터 작성 ---------------------------------------------
 import androidx.appcompat.app.AppCompatActivity;

 import android.os.Bundle;
 import android.view.Window;
 import android.webkit.WebSettings;
 import android.webkit.WebView;
 import android.webkit.WebViewClient;

 public class MainActivity extends AppCompatActivity {
     public WebView webView;

     @Override
     protected void onCreate(Bundle savedInstanceState) {
         super.onCreate(savedInstanceState);
         requestWindowFeature(Window.FEATURE_NO_TITLE);
         setContentView(R.layout.activity_main);

         webView = (WebView)findViewById(R.id.webView);
         WebSettings webSettings = webView.getSettings();
         webSettings.setJavaScriptEnabled(true);

         // 앱에서 표시할 url 입력
         webView.loadUrl("앱으로 만들 웹사이트 주소");
         webView.setWebViewClient(new WebViewClient());
     }

     //폰의 뒤로가기 버튼의 동작 입력
     @Override
     public void onBackPressed() {
         if(webView.canGoBack()) {
             webView.goBack();
         } else {
             super.onBackPressed();
         }
     }
 }
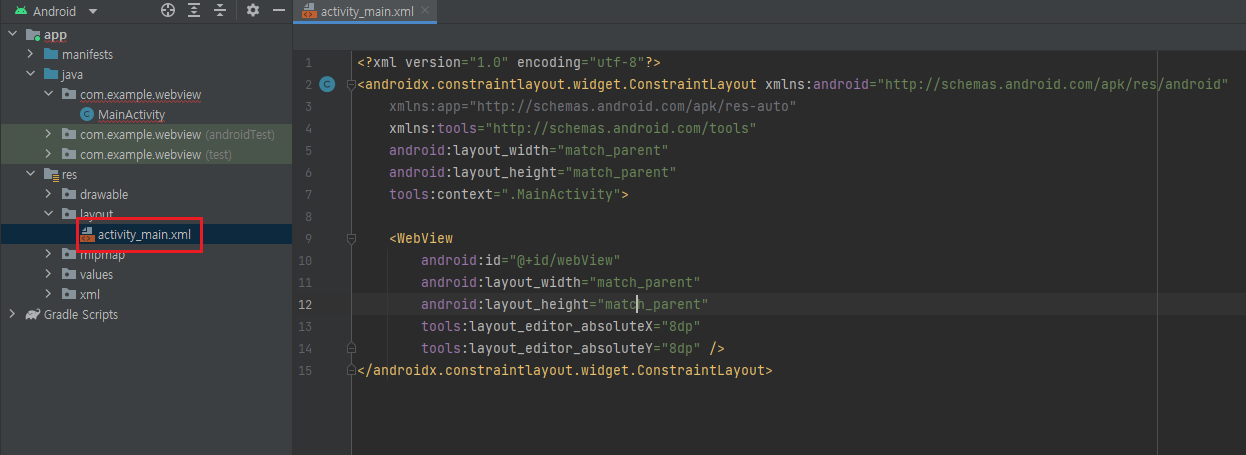
2. activity_main.xml
경로 : app > res > layout > activity_main.xml
 <?xml version="1.0" encoding="utf-8"?>
 <androidx.constraintlayout.widget.ConstraintLayout xmlns:android="http://schemas.android.com/apk/res/android"
     xmlns:app="http://schemas.android.com/apk/res-auto"
     xmlns:tools="http://schemas.android.com/tools"
     android:layout_width="match_parent"
     android:layout_height="match_parent"
     tools:context=".MainActivity">

     <WebView
         android:id="@+id/webView"
         android:layout_width="match_parent"
         android:layout_height="match_parent"
         tools:layout_editor_absoluteX="8dp"
         tools:layout_editor_absoluteY="8dp" />
 </androidx.constraintlayout.widget.ConstraintLayout>

 //url을 불러올 webView창으로 화면을 채우는 내용입니다.
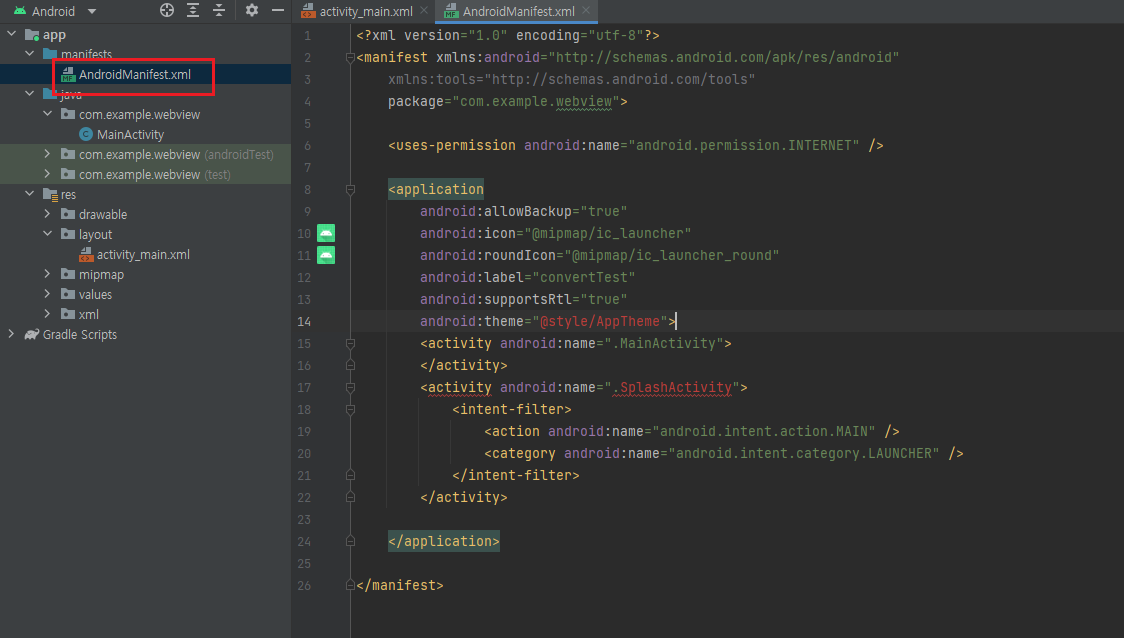
3. AndroidManifest.xml
경로 : app > manifests > AndroidManifest
웹사이트의 주소가 https 가 아닌 http 라면 application 태그에 android:usesCleartextTraffic="true" 를 추가 해주세요! 이렇게 설정 해주어야 http 통신이 허용되어 앱으로 만들었을 때 페이지가 정상적으로 뜹니다.
 <?xml version="1.0" encoding="utf-8"?>
 <manifest xmlns:android="http://schemas.android.com/apk/res/android"
     package="com.example.webview">

     이곳부터 작성 ---------------------------------------------

     <uses-permission android:name="android.permission.INTERNET" />

     <application
         android:allowBackup="true"
         android:icon="@mipmap/ic_launcher"
         android:roundIcon="@mipmap/ic_launcher_round"
         android:label="앱이름"
         android:supportsRtl="true"
         android:theme="@style/AppTheme">
         <activity android:name=".MainActivity">
     	</activity>
     	<activity
         android:name=".SplashActivity"
         android:exported="true">
         	<intent-filter>
             <action android:name="android.intent.action.MAIN" />
             <category android:name="android.intent.category.LAUNCHER" />
         	</intent-filter>
     	</activity>
 	</application>

 </manifest>
.SplashActivity 해당 파일을 생성하지 않았기 때문에 에러가 납니다. 해당 파일을 만들어 주겠습니다.
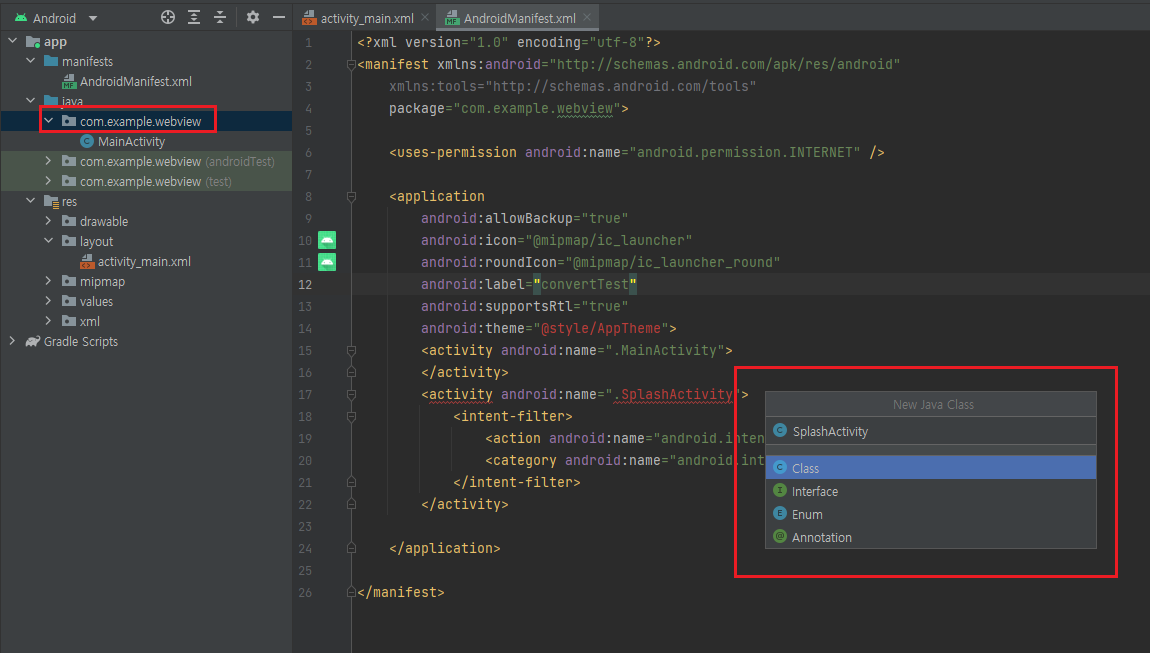
4. SplashActivity
경로 : app > java > 패키지이름 > SplashActivity.java 파일 생성
패키지이름 오른쪽 마우스 클릭 > New > Java Class 를 클릭 하여 SplashActivity 를 입력 후 엔터를 눌러 java 파일을 생성 후 아래 내용을 복붙 합니다.
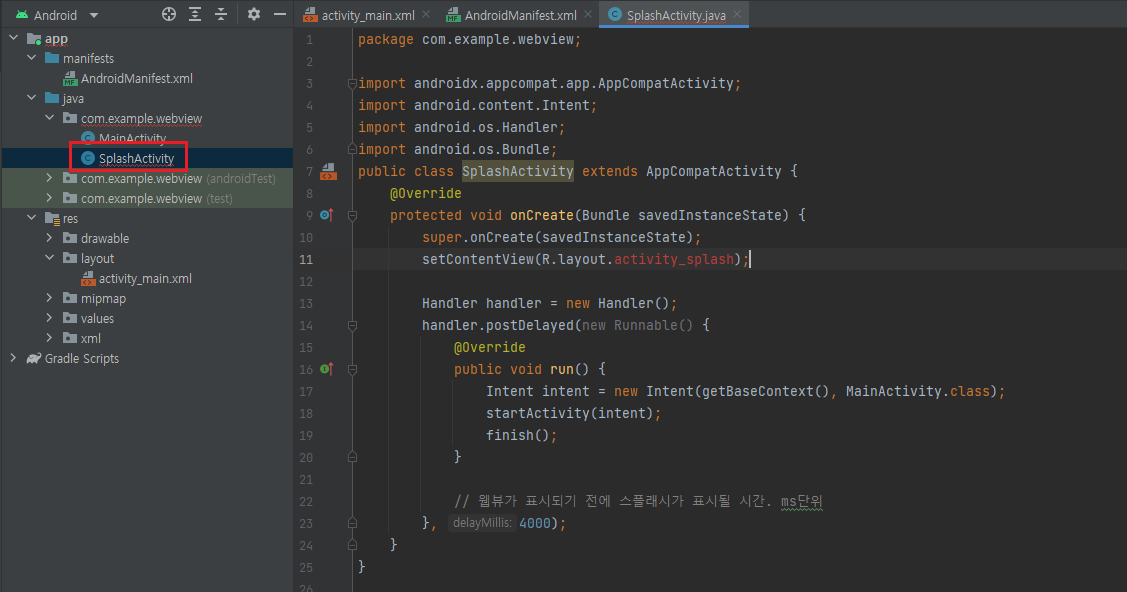
 package com.example.webview;

 이곳부터 작성 ---------------------------------------------

 import androidx.appcompat.app.AppCompatActivity;
 import android.content.Intent;
 import android.os.Handler;
 import android.os.Bundle;
 public class SplashActivity extends AppCompatActivity {
     @Override
     protected void onCreate(Bundle savedInstanceState) {
         super.onCreate(savedInstanceState);
         setContentView(R.layout.activity_splash);

         Handler handler = new Handler();
         handler.postDelayed(new Runnable() {
             @Override
             public void run() {
                 Intent intent = new Intent(getBaseContext(), MainActivity.class);
                 startActivity(intent);
                 finish();
             }

             // 웹뷰가 표시되기 전에 스플래시가 표시될 시간. ms단위
         }, 4000);
     }
 }
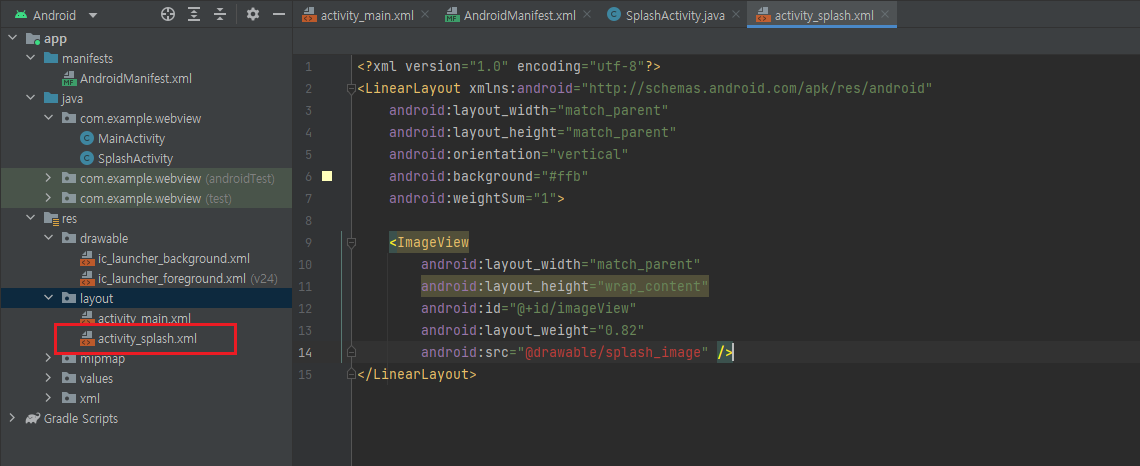
5. activity_splash.xml
경로 : app > res > layout > activity_splash.xml 파일 생성 후 아래코드를 복붙 해줍니다.
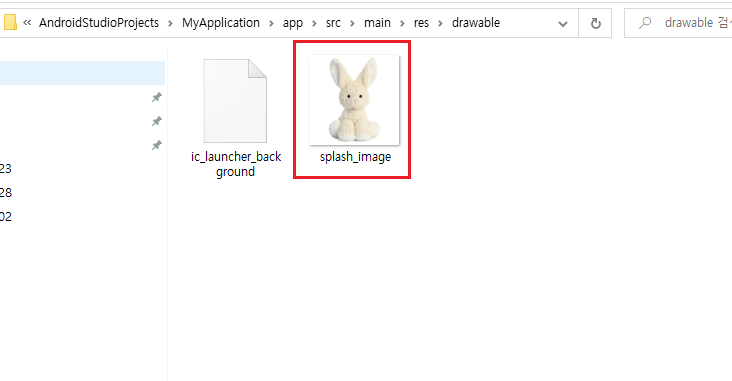
app > res > drawable 우클릭 > open in > Explorer 클릭하여 해당 경로를 열어주고 drawable 폴더에 이미지 이름을 splash_image로 변경하여 파일을 넣어줍니다.
 <?xml version="1.0" encoding="utf-8"?>
 <LinearLayout xmlns:android="http://schemas.android.com/apk/res/android"
     android:layout_width="match_parent"
     android:layout_height="match_parent"
     android:orientation="vertical"
     android:background="#FFFFFF"
     android:gravity = "center"
     android:weightSum="1">

     <ImageView
         android:layout_width="100dp"
         android:layout_height="100dp"
         android:id="@+id/imageView"
         android:layout_weight="0.82"
         android:layout_gravity = "center"
         android:src="@drawable/splash_image" />
 </LinearLayout>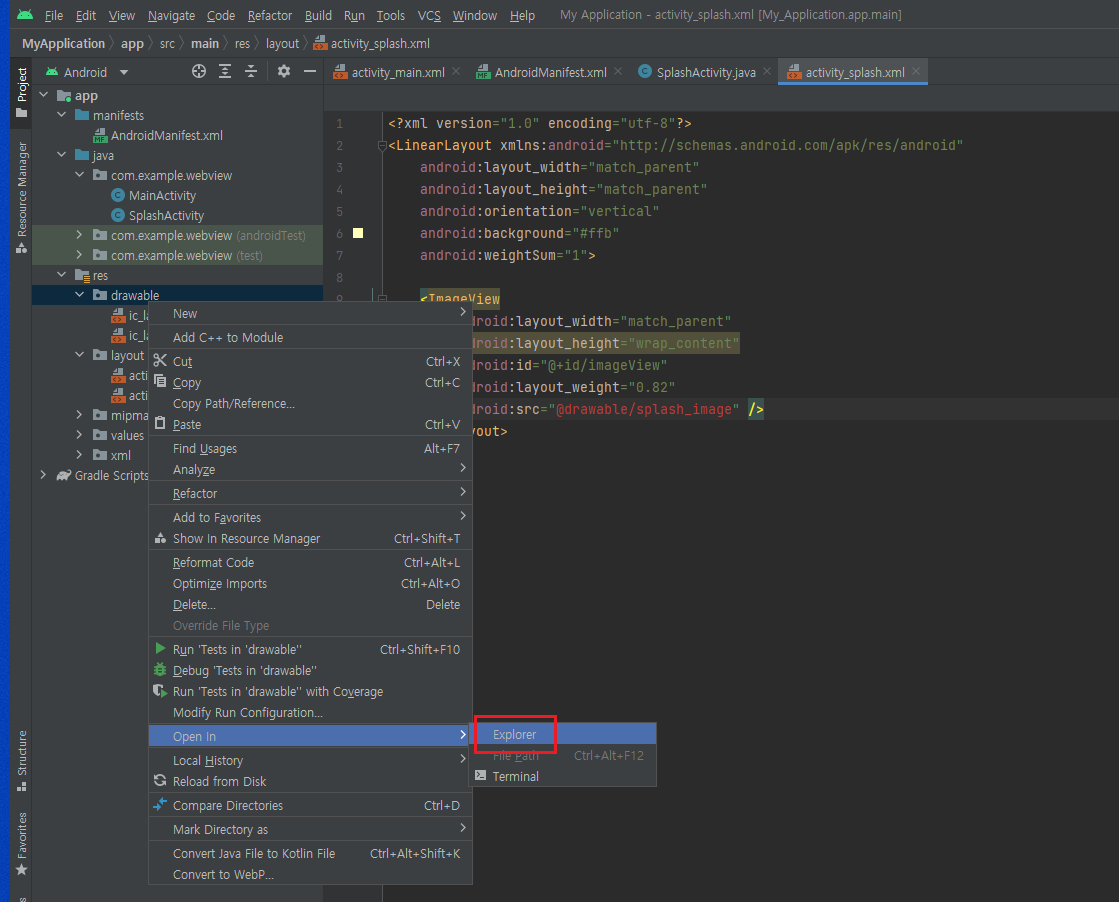
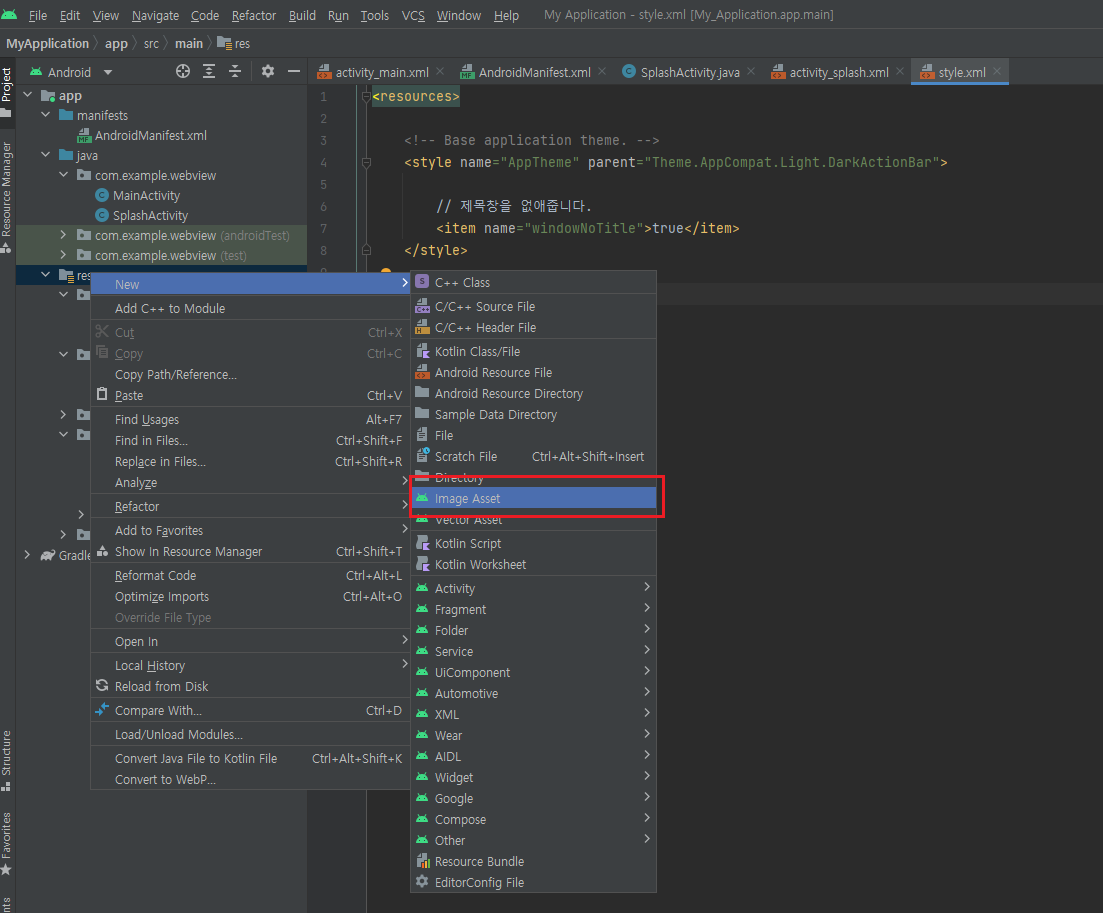
6. style.xml
경로 : app > res > values > style.xml 파일 생성
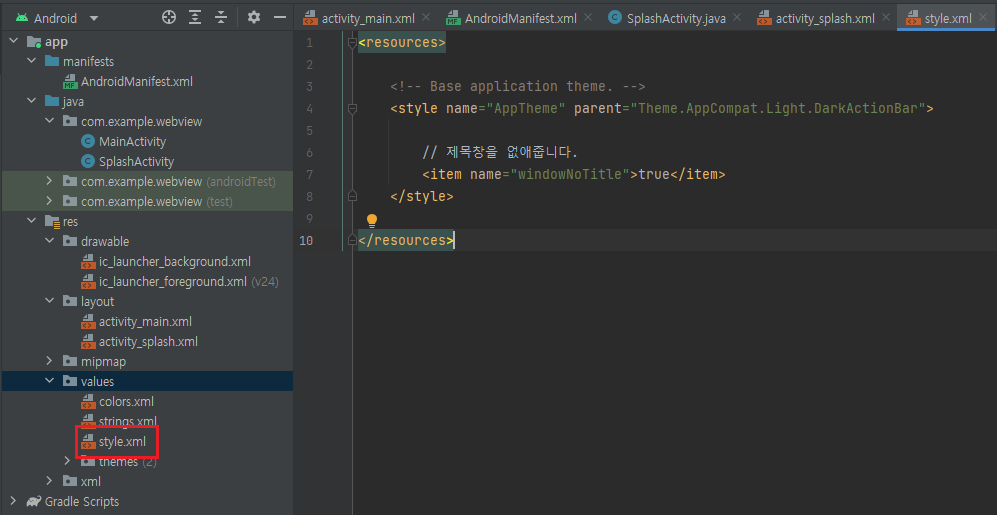
 <resources>

     <!-- Base application theme. -->
     <style name="AppTheme" parent="Theme.AppCompat.Light.DarkActionBar">

         // 제목창을 없애줍니다.
         <item name="windowNoTitle">true</item>
         <item name="windowActionBar">false</item>
         <item name="android:windowContentOverlay">@null</item>
         <item name="android:windowIsTranslucent">true</item>
     </style>

 </resources>
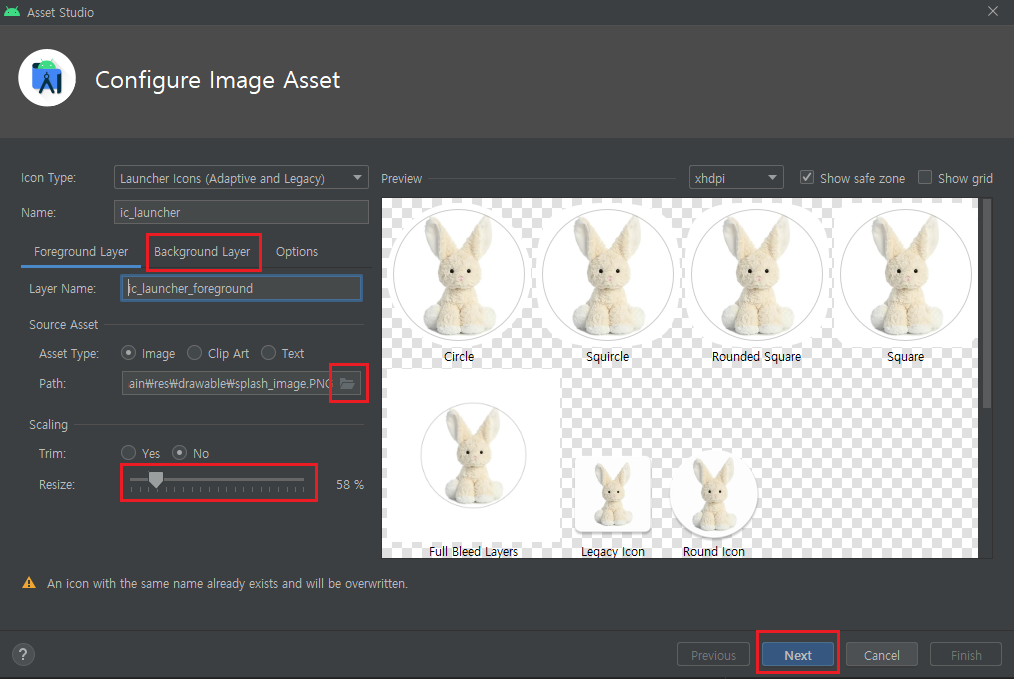
앱 아이콘 설정
1. Image Asset
res 우클릭 > New > Image Asset을 선택합니다.
2. 아이콘 불러오기
Path에서 이전 단계에서 저장했던 이미지 파일을 불러 온 후 사이즈 및 배경 색을 맞춰 주고 Next 버튼을 클릭합니다.
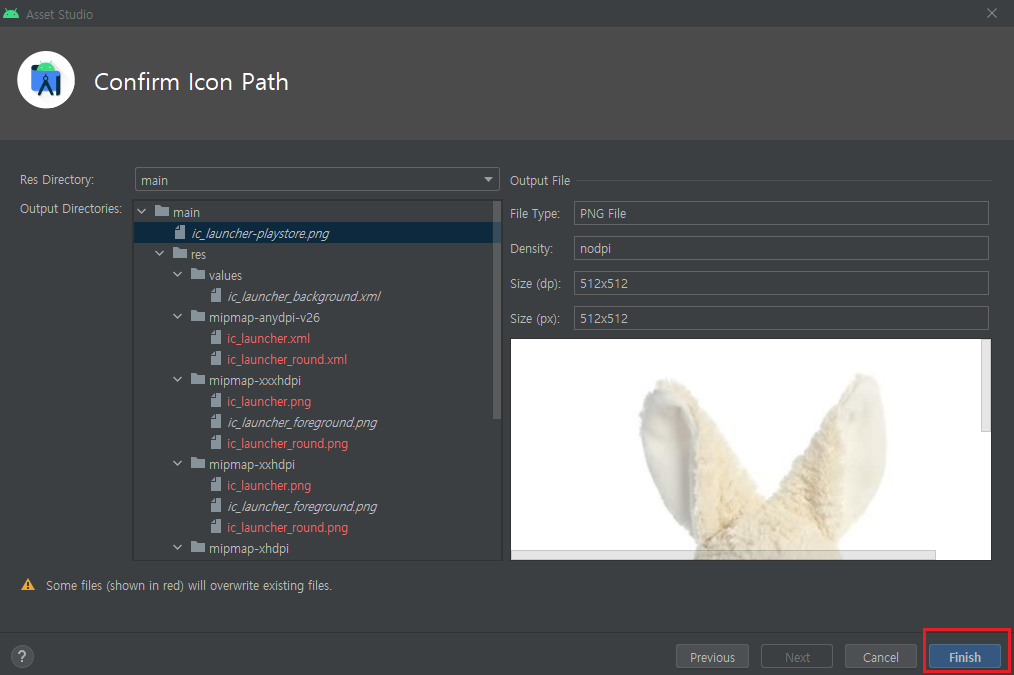
3. 아이콘 path 확인
빨간 부분은 무시하고 그대로 Finish 버튼을 눌러주세요. 배경 색을 맞춰 주고 Next 버튼을 클릭합니다.
앱으로 출력하기
1. Create Signed Bundle / APK
상단 메뉴에서 Build > Generate Signed Bundle / APK를 선택합니다.

2. APK 선택
APK 선택 후 Next 버튼을 클릭합니다.

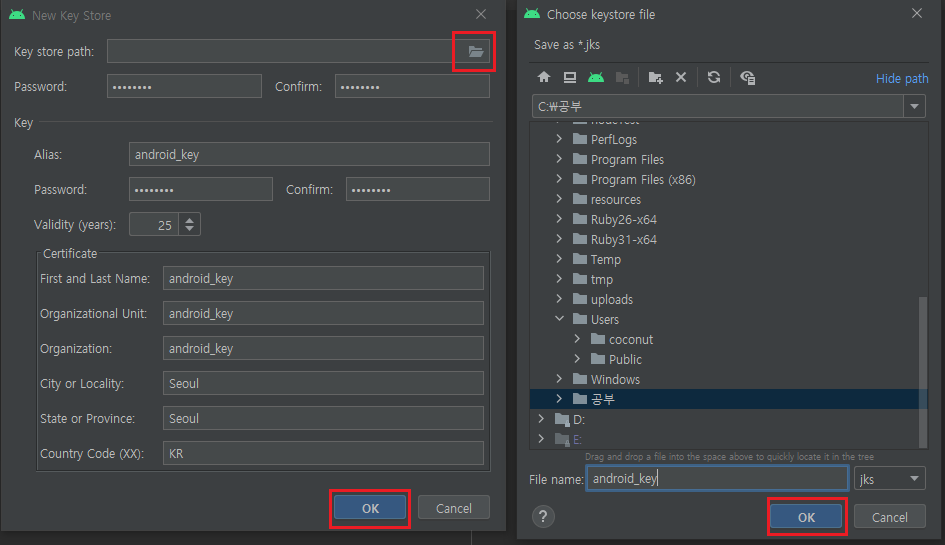
3. New Key Store
기존 key가 없다면 Create new 버튼을 클릭하여 Key 저장 경로를 선택 해주고 정보들을 입력후 OK 버튼을 클릭해주세요. 기존 키가 있다면 Choose existing 버튼을 클릭하여 key를 선택해주시면 됩니다. (잘보관해주세요.)
관해주세요.)
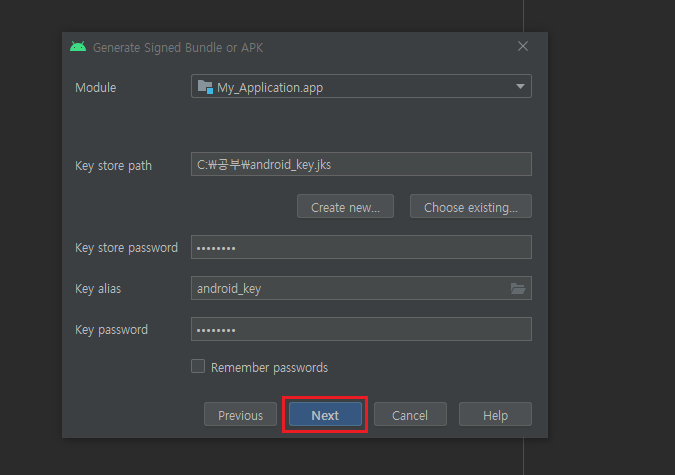
4. key 확인
정보들이 제대로 불러와 졌다면 Next 버튼을 클릭해주세요.
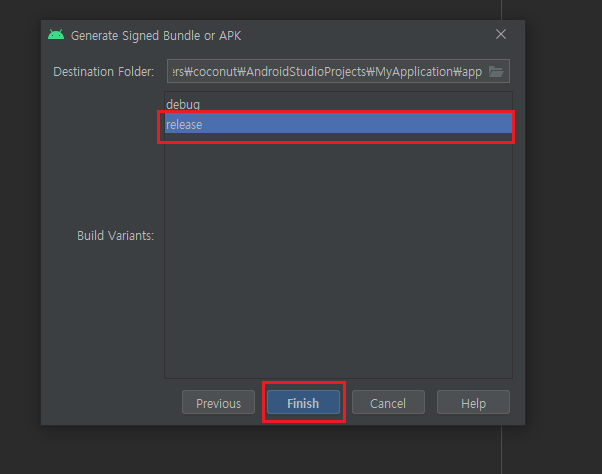
5. release 선택
경로를 정해주고 release 를 선택 후 Finish 버튼을 클릭합니다.
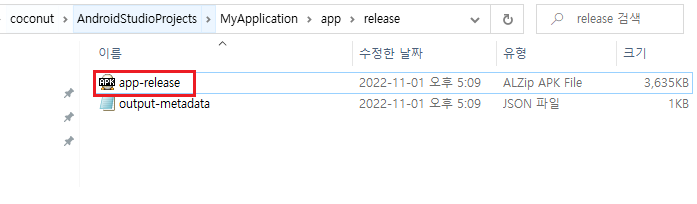
6. apk 파일 확인
지정해준 경로 폴더로 이동하면 생성된 apk 파일을 볼 수 있습니다.